Secure API Gateway with Amazon Cognito using SAM
Getting basic authentication for your API is not as hard as it sounds. In this post we'll be going through the steps to secure your APIs with Amazon Cognito
Backstory
I create a lot of APIs, these are for blog posts, for playing around with new functionality or tools that I’ve created for myself. All of these have been created without authentication in place. Not securing APIs can create data exposures for you, but it can also pose a financial risk to your accounts if a malicious user gets your endpoints. This is why I want to secure any API I create but I want this to be with minimal setup so that it’s simple to replicate many times.
We first need to understand a few concepts around what we’re setting up.
What is Cognito?
Amazon Cognito is a service provided by AWS that allows you to add authentication to your applications or services. It integrates natively with API Gateway to secure each endpoint.
Cognito has multiple layers where you can apply different types of configurations, this gives us the flexibility to get things setup for different use cases.
-
User Pool - A Cognito user pool is the backbone to everything in Cognito. This is an OpenID Connect identity provider which contains the user directory to authenticate and authorize users.
-
User Pool Domain - The user pool domain is used to give the authentication url a better name for users and applications to authenticate with.
-
Resource Server - An OAuth 2.0 API server that validates that an access token contains the scopes that authorize the requested endpoint in the API.
-
User Pool Client - A user pool client is a configuration within a user pool that directly interacts with your application that will be authenticating using Cognito.
Authentication Flows
There are several authentication flows that you can use for your applications. In this post from Auth0 you can get a better understanding about which flow is better for your use case.
Since I am setting up very basic authentication to be able to test my API using Postman I will use the Client Credentials Flow (CCF) to allow us to authenticate our requests by getting an access token by sending a client id and a client secret to Cognito. This token is a JSON Web Token (JWT). The CCF is recommended when working with Machine-to-Machine (M2M) communication like CLIs, APIs, etc.
Setting it all up with SAM
I don’t want to have a Cognito User Pool per API created, to simplify this I will have a single Auth Stack that will contain the User Pool and the User Pool Domain resources. We will then share the data from this stack to our API stacks to be able to create the Resource Server and User Pool Clients separately. Below is a picture that shows this structure.
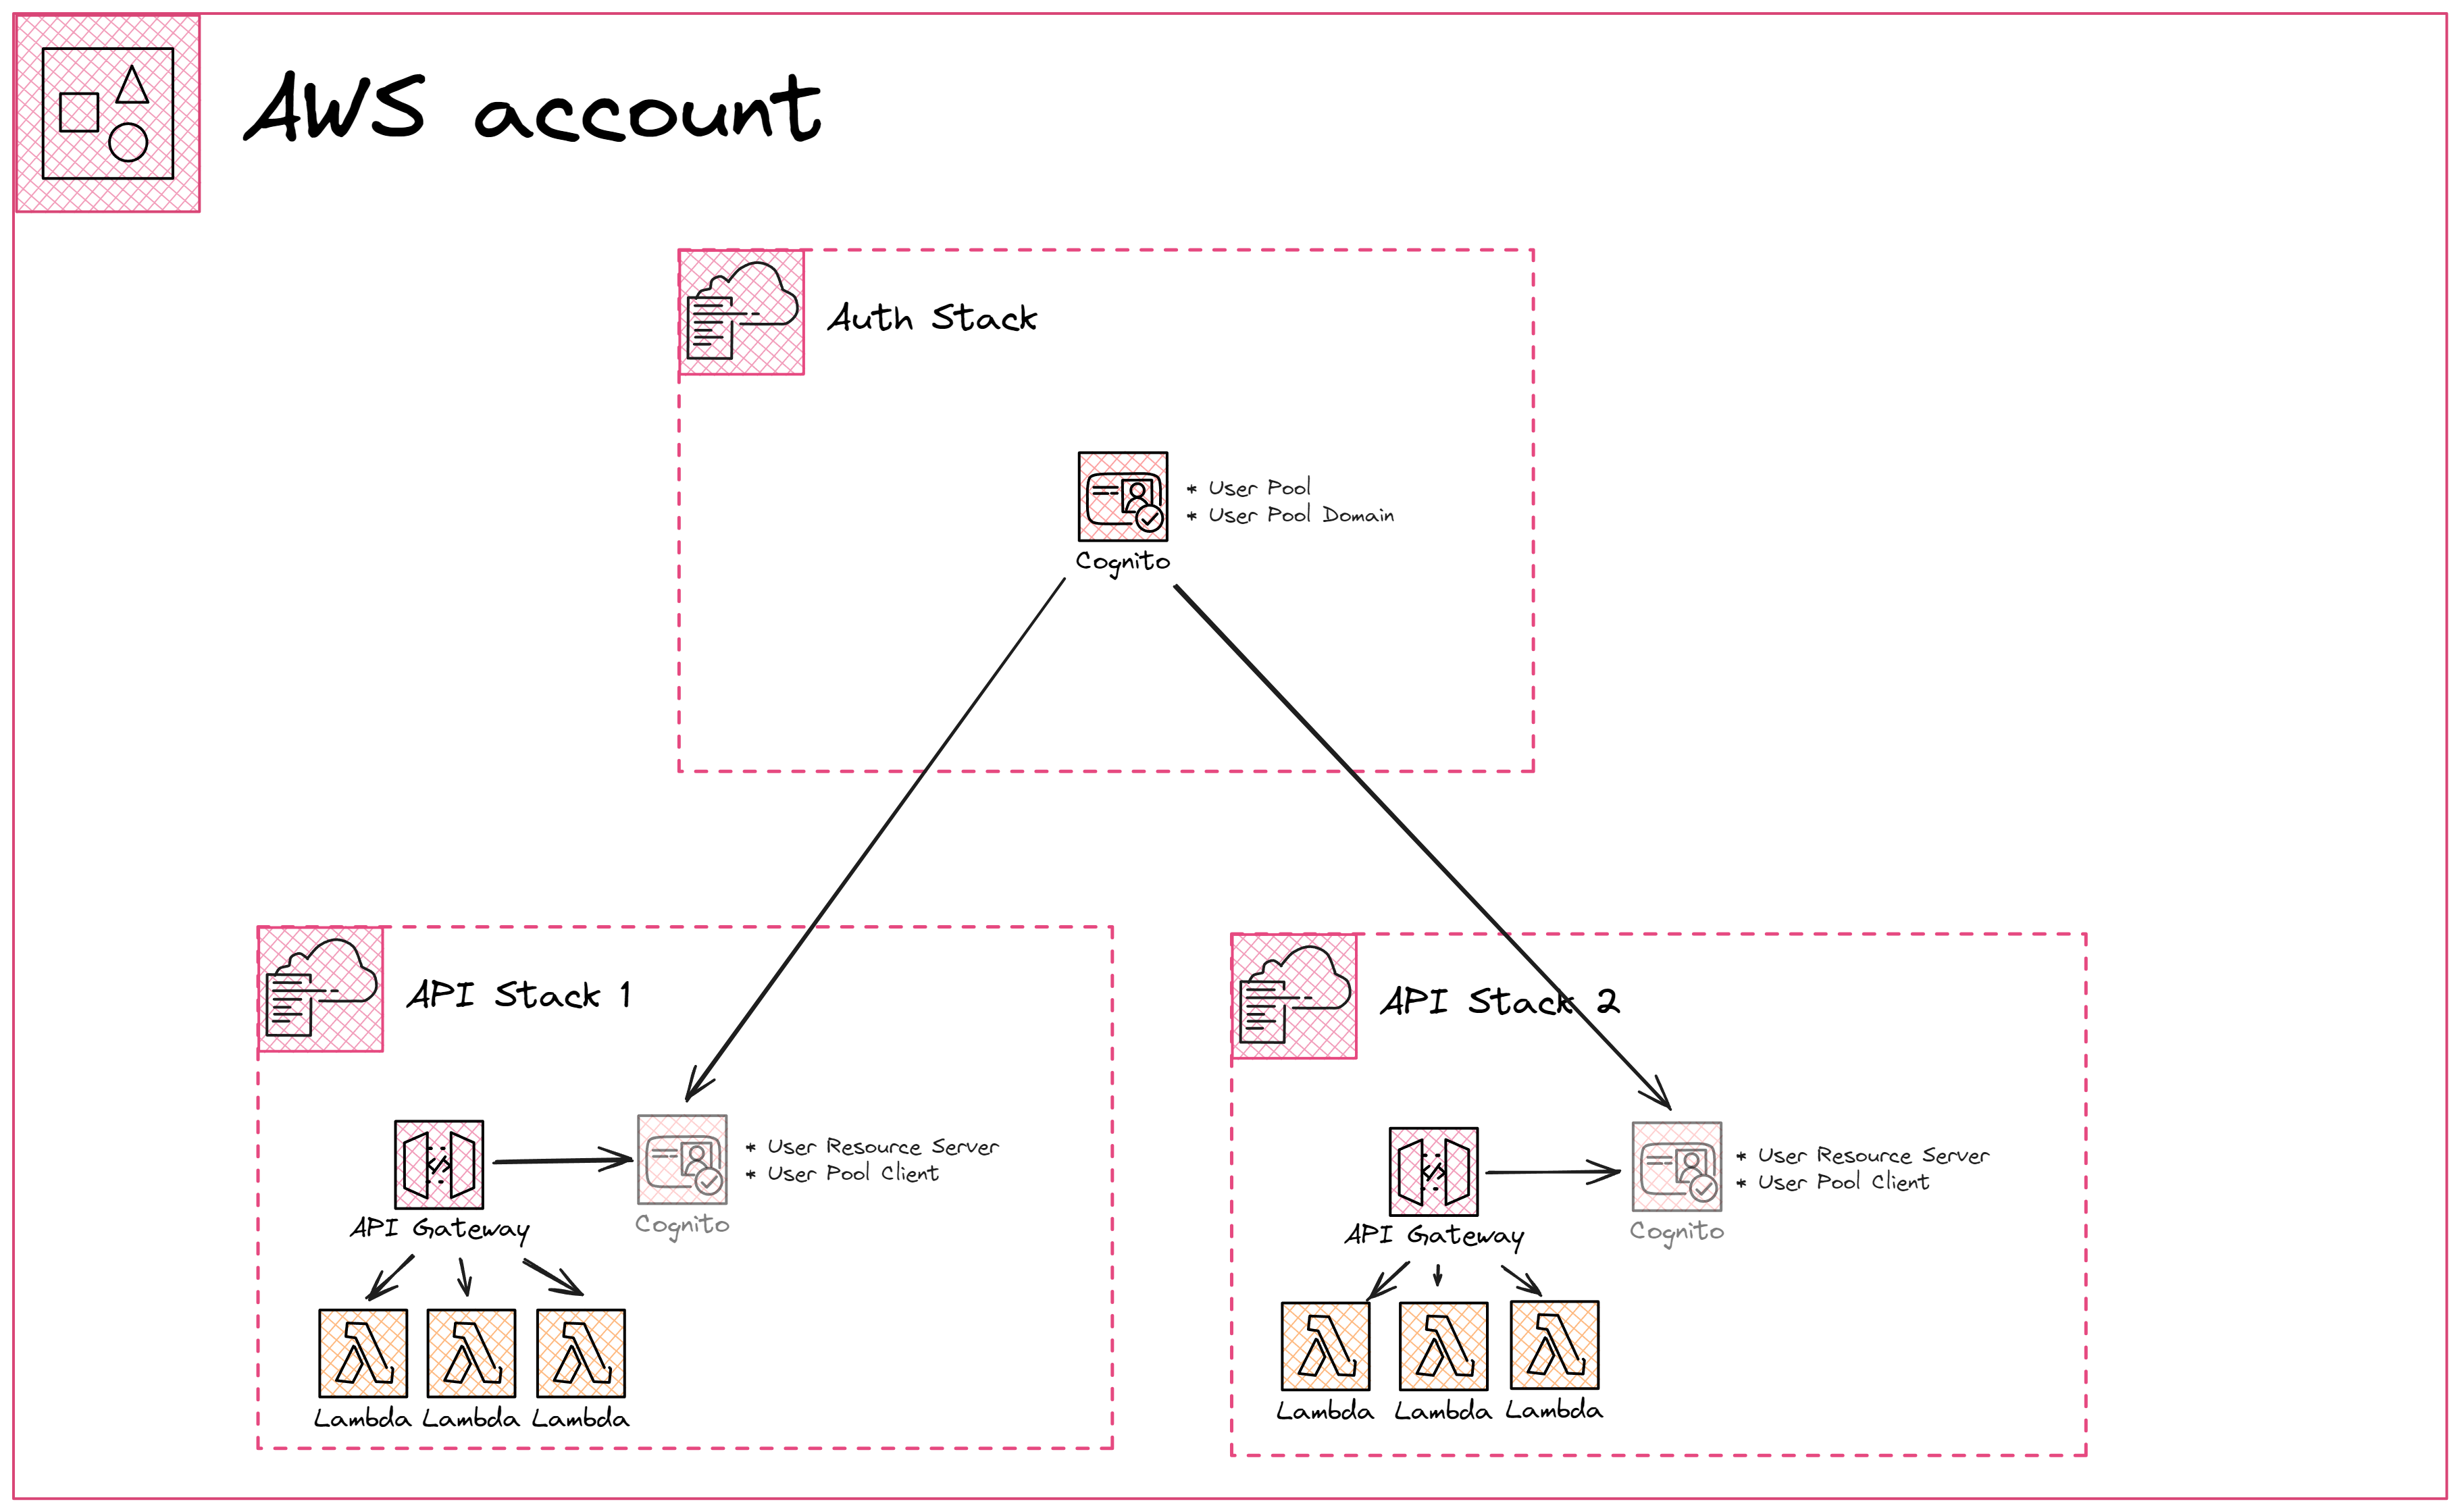
Now let’s see how each of these pieces are set up using SAM.
Auth Stack
In this stack we are going to define the resources that will be consumed by other APIs to authenticate.
You can find my full setup for this stack in this GitHub repository
1. User Pool
The User Pool doesn’t require a lot of configuration when doing CCF. You are able to add more restrictions and configuration but as mentioned before, we are trying to keep it simple for now.
  CognitoUserPool:
    Type: AWS::Cognito::UserPool
2. User Pool Domain
In my setup I’m using andmoredev as my domain which makes our authentication base url look like https://andmoredev.auth.us-east-1.amazoncognito.com. You can setup up your own custom domain by setting up the CustomDomainConfig.
  CognitoUserPoolDomain:
    Type: AWS::Cognito::UserPoolDomain
    Properties:
      UserPoolId: !Ref CognitoUserPool
      Domain: andmoredev
We need to make sure other stacks can get access to the User Pool Id and ARN to be able to create the resource server and user pool client. To do this we are going to use SSM Parameters.
  CognitoUserPoolIdParameter:
    Type: AWS::SSM::Parameter
    Properties:
      Name: !Sub /${AWS::StackName}/CognitoUserPoolId
      Type: String
      Value: !Ref CognitoUserPool

  CognitoUserPoolArnParameter:
    Type: AWS::SSM::Parameter
    Properties:
      Name: !Sub /${AWS::StackName}/CognitoUserPoolArn
      Type: String
      Value: !GetAtt CognitoUserPool.Arn
Now we can go and add authentication to our API stack using this user pool.
API Stack
I will be adding authentication to an existing API in this GitHub repository. To look at the specific changes I made to get authentication working, you can look at the PR where I did this.
1. Consuming Auth Stack resources
We first need to get the user pool Id and ARN from SSM by adding them into the Parameters section of our template.
Parameters:
  CognitoUserPoolId:
    Type: 'AWS::SSM::Parameter::Value<String>'
    Default: '/andmoredev-auth/CognitoUserPoolId'

  CognitoUserPoolArn:
    Type: 'AWS::SSM::Parameter::Value<String>'
    Default: '/andmoredev-auth/CognitoUserPoolArn'
2. Resource Server
We are creating a resource server with one scope that will be used to give access to all endpoints in our API. I will not go into more details on more advanced scope design in this post.
  LayerlessESBuildResourceServer:
    Type: AWS::Cognito::UserPoolResourceServer
    Properties:
      UserPoolId: !Ref CognitoUserPoolId
      Identifier: layerless-esbuild
      Name: Layerless ESBuild
      Scopes:
        - ScopeName: api
          ScopeDescription: Allow api access
3. User Pool Client
Below is the definition for our user pool client.
  CognitoTestAutomationClient:
    Type: AWS::Cognito::UserPoolClient
    DependsOn:
      - PostmanResourceServer
    Properties:
      UserPoolId: !Ref CognitoUserPoolId
      GenerateSecret: true
      AllowedOAuthFlows:
        - client_credentials
      AllowedOAuthScopes:
        - layerless-esbuild/api
      AllowedOAuthFlowsUserPoolClient: true
Let’s talk about the properties we’ve here.
- UserPoolId - reference to the id of the user pool created in our Auth Stack.
- GenerateSecret - this is necessary for us to use with client credentials flow.
- AllowedOAuthFlows - we are telling Cognito that this client will only allow CCF
- AllowedOAuthScopes - We need to make sure this array contains scopes that have been defined in our resource server.
- AllowedOAuthFlowsUserPoolClient - This is what enables us to use standard OAuth functionality with our user pool client.
I’ve seen deployment scenarios where the resource server gets deployed after the client and we get an error saying the scope does not exist, this is the reason I am explicitly adding the DependsOn for this resource.
4. Hooking it all up to API Gateway
To tell our API Gateway to authenticate using our new cognito user pool we need to add the Auth property, it will look something like this.
  Auth:
    DefaultAuthorizer: ClientCognitoAuthorizer
    Authorizers:
      ClientCognitoAuthorizer:
        UserPoolArn: !Ref CognitoUserPoolArn
        AuthorizationScopes:
          - layerless-esbuild/echo
We are consuming the user pool ARN from the Auth Stack and allowing the scope that we’ve created in our resource server.
THAT IS ALL! Now we can deploy this stack to be able to test it.
Testing it with Postman
1. Grab authentication data
To test this we need to go into the AWS console and grab the Client Id and Client Secret that were generated. These are located in the Cognito service by selecting the new user pool and going in the App integration section. In the bottom you will see your new app client, once you open it you will see something like the image below. You can copy the Client ID and Client secret from here, we will use these values in the next steps.
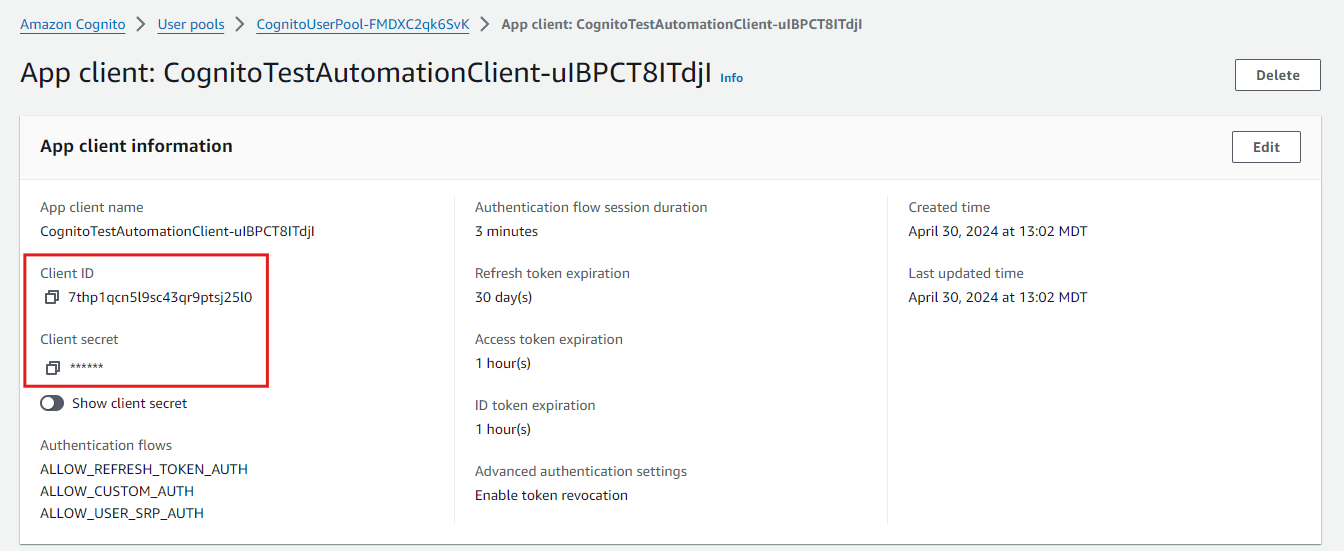
Please handle these values with care, if compromised someone could gain access to your APIs and do malicious things.
2. Test un-authenticated request
To verify our API is secure we will first run an unauthenticated request. To do this we will call our endpoint without setting anything for authentication, when we send this request we should get a 401 - Unauthorized response as shown below.

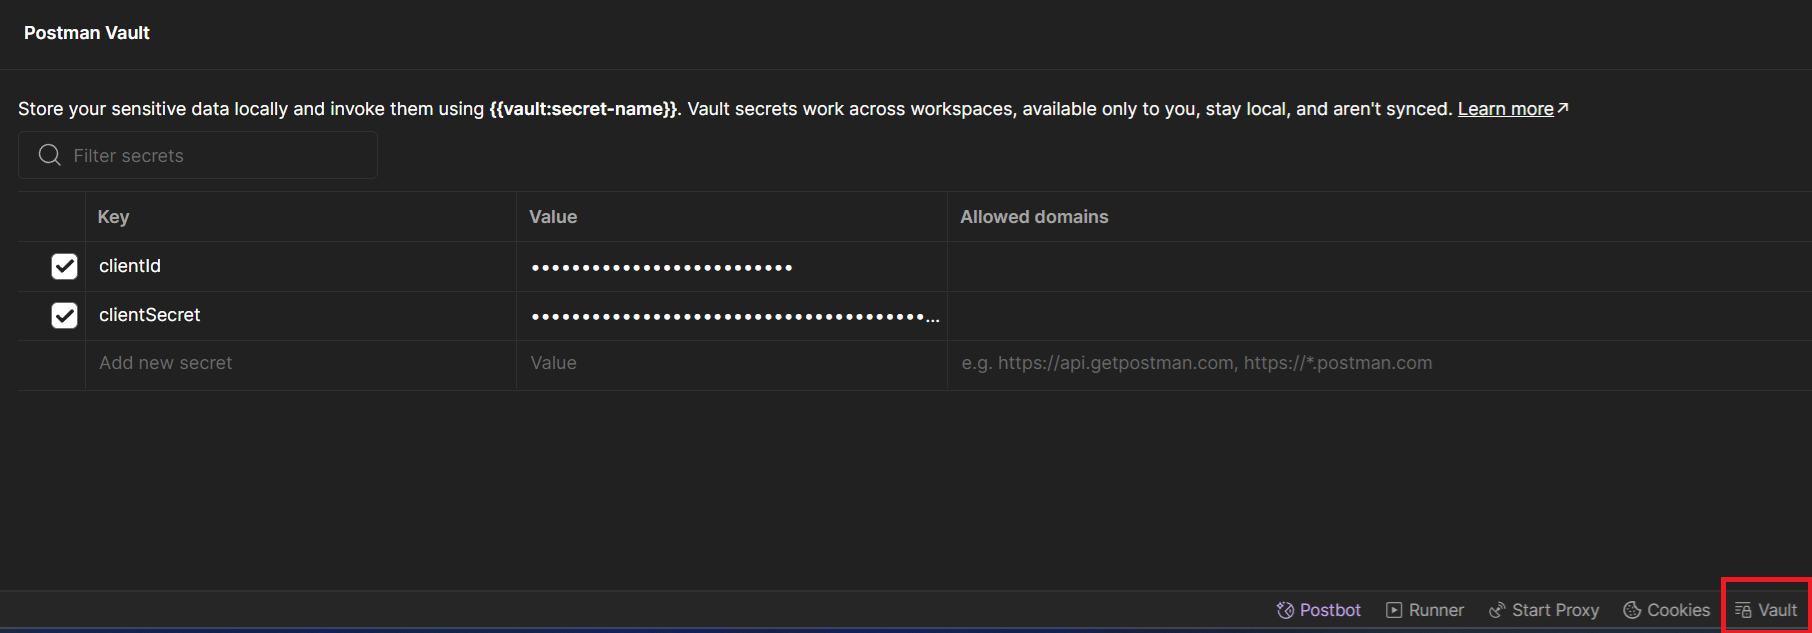
3. Set authentication data in Postman
With the values we will now use a new Postman feature called Vaults that allows us to securely store sensitive data. To do this we will go into the Vault section in the bottom of the window and add our secrets.
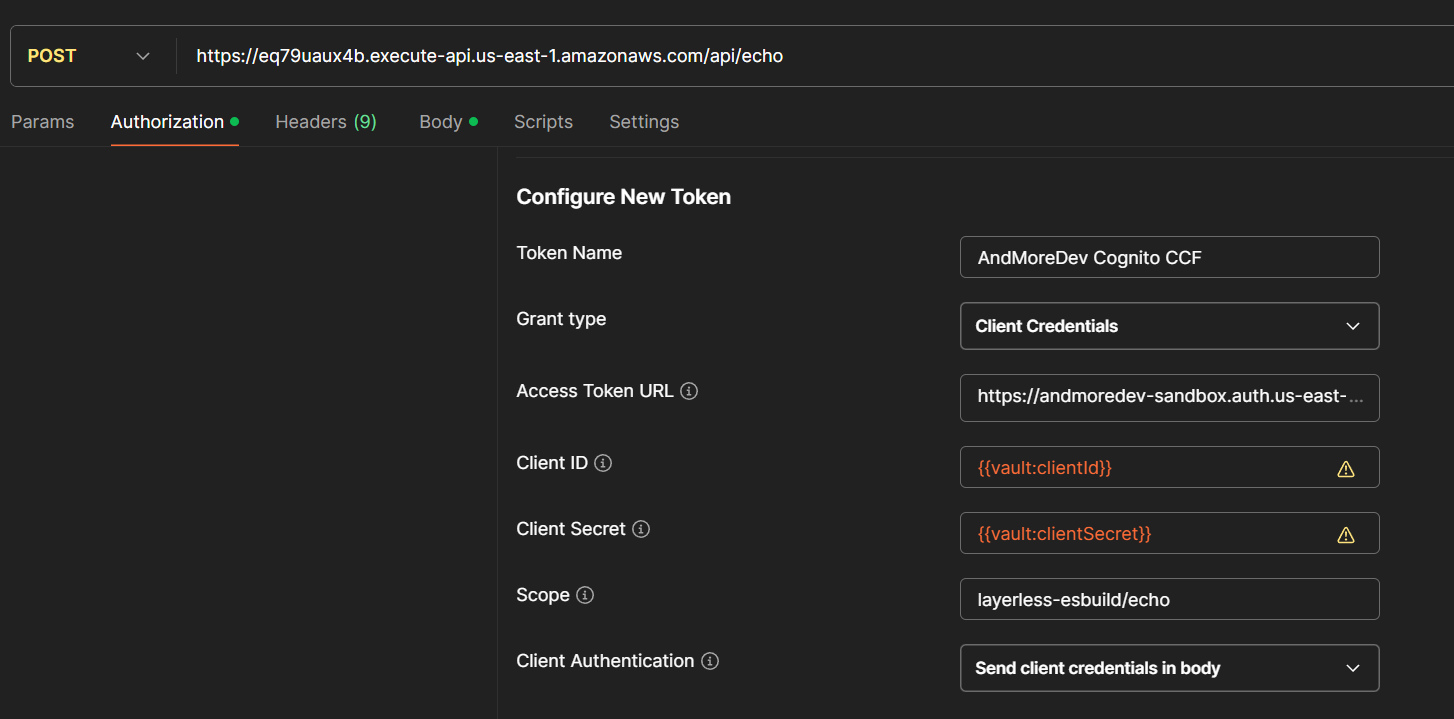
4. Setup request authentication
Now back in the Postman request we can set the Authorization configuration. There are several parameters to set here.
- Grant type - This will have a value of Client Credentials specifying that we will be using the client credentials flow.
- Access Token URL - The value for your specific user pool will vary depending on your configured user pool domain. It will look something like this
https://[your-domain].auth.us-east-1.amazoncognito.com/oauth2/token - Client ID - We will grab this from the vault by setting a value of
{{vault:clientId}} - Client Secret - Also from the vault with a value of
{{value:clientSecert}} - Scope - This will be based on what was set on the resource server. From our example it is
layerless-esbuild/echo.
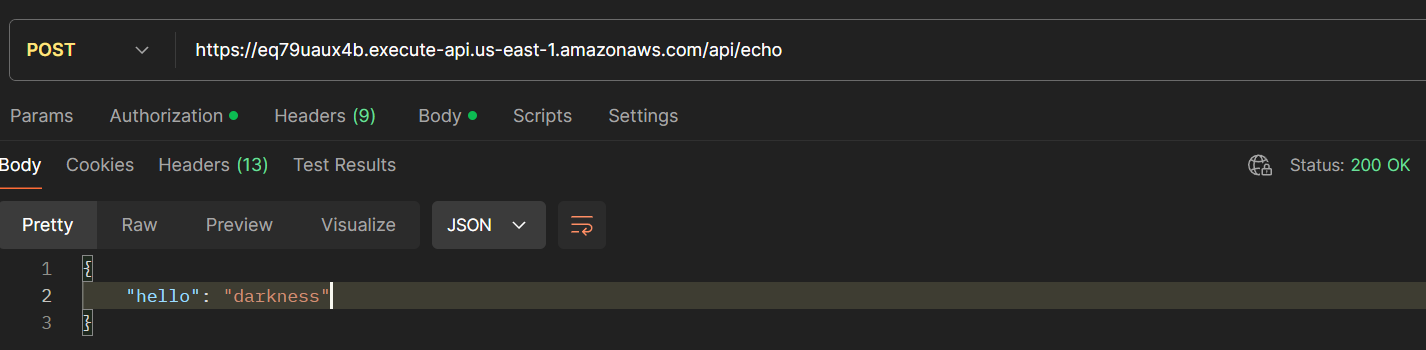
5. Get the JWT
We can now get a new access token by going to the bottom of the Authorization section and pressing the Get New Access Token button. If successful you will receive a prompt where you can click a button that says Use Token. By pressing that button you will get the value presented in the Access Token and it will be used in the Authorization header of your request.
If we send the request now we will get a successful response.
Wrap Up
Sadly security is often left as an afterthought, just like it happened to me with all the APIs I’ve created. In this post we were able to understand a few of the concepts relating to authentication and the resources necessary to set this up in AWS with Amazon Cognito. We also tested that our API is now secure and how we can get a token to authenticate against it.
I hope this allows people to add a basic layer of security to their APIs so that we make malicious users work a little bit more.